The LS motor has gained immense popularity, and for good reason. It is a potent engine that has proven to be a worthy successor to the original small block. Whether you have a 4.8-liter LR4 or the supercharged LS9, Comp Cams has the perfect camshaft for you. We’ll explore swapping a camshaft in an LS3 crate motor, highlighting the necessary steps and precautions.
To begin the cam swap, the valve cover, coil pack, and spark plugs must be removed. By taking off the valve cover, access to the rockers is granted. The next step involves unbolting all the rockers, including the two spring-loaded ones. These two rockers require special attention and should be dealt with after rotating the motor.
The two spring-loaded rockers can be easily removed once the other rockers are loosened and rotated. It is also essential to remove all the push rods, especially if the factory application had non-hardened push rods. Comp Cams recommends replacing them with hardened push rods, mainly when dealing with increased valve spring pressure.
After completing the procedure on the driver’s side, the same steps are repeated on the passenger side. With the rockers and push rods removed, attention is turned to the front of the motor. In the case of a crate motor like the LS3, the process is relatively straightforward, involving the removal of the water pump, dampener, and front cover.
The water pump is secured by six ten-millimeter bolts, which must be removed. I would suggest changing the gaskets if the motor has accumulated significant mileage. Removing the dampener allows access to the camshaft. A unique tool designed for LS dampers disengages the teeth and removes the dampener.
The front cover is removed, followed by rotating the motor to lift the lifters into the trays and aligning the timing marks. This step ensures that the camshaft can be changed at top dead center. The upper and lower timing sprockets are observed, indicating the correct position. The upper and lower timing marks are aligned to set the motor at TDC.
With the motor at TDC, the cam swap can begin. The chain tensioner should have its tension released, and the cam bolts can be removed. The timing sprocket is detached to access the cam retaining plate, which is unbolted carefully, taking note of the gasket. The cam is then spun a few times to confirm the lifters are secured in the lifter trays. Tools are used to ensure the lifters remain in place during the cam removal.
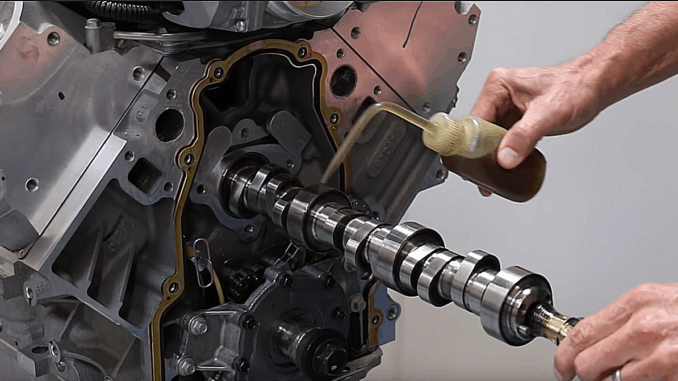
Before installing the new Comp Cams camshaft, it is crucial to clean and oil it thoroughly. The camshaft is inserted, and the cam retaining plate is torqued to the factory specifications. The cam sprocket is reassembled, making sure the timing marks on the sprocket align with the upper and lower sprockets. The sprocket is securely fastened, and the tensioner pin is removed.
When installing a performance cam, using the appropriate cam sprocket is essential. In this case, a three-bolt cam required a corresponding three-bolt cam sprocket. The front timing cover is then attached but only finger-tightened initially since the cover bolts cannot be tightened until the dampener is in place.
The dampener is installed, and a homemade tool can be used to tighten it initially before using the factory bolt. Following the GM procedure, the bolt is tightened to 250 foot-pounds, backed off, torqued to 37 foot-pounds, and rotated an additional 140 degrees.
Reassembling the motor involves tightening the front cover bolts, followed by the installation of push rods and rocker arms. The rocker arms should be run down lightly before tightening the ones without spring pressure. Finally, the valve cover and coil pack are replaced, and the spark plugs are installed.
With the cam swap complete, it’s worth noting that a camshaft alone can provide significant power gains, sometimes up to 40, 50, or even 60 horsepower. So, if you’re looking to enhance the performance of your LS motor, consider investing in a camshaft and getting back to basics.


