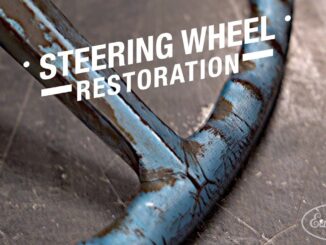
This steering wheel from the 1960s had developed a lot of cracks that left large gaps in the plastic. These cracked steering wheels are very common in cars from the 1950s and 1960s. The plastic that was used to make these steering wheels is a very rigid plastic.
Thankfully, Polyvance’s PlastiFix kit works great on the rigid plastics that were used to make these steering wheels. This video shows you how to use Polyvance’s PlastiFix repair kit to restore cracked classic steering wheels…
Products Used
Polyvance products used for this cracked steering wheel restoration:
- 1000 Super Prep Plastic Cleaner (three options available) OR 1001-4 EcoPrep Plastic Cleaner
- PlastiFix Kit (several options available)
- Aluminum Body Tape (three options available)
- Hardset Filler
- Plastic Magic Adhesion Promoter (several options available)
- All Seasons E-Z Sand Primer Surfacer
- All Seasons Sealer (several options available)
Other products used for this cracked steering wheel restoration:
- Lazy Susan (ou need to get this — it made the job much easier): https://amzn.to/33TorUI
DIY How-To Video Transcript
Many steering wheels from the 50s and 60s develop cracks over time and develop large gaps. This steering wheel from a 1966 Chrysler Newport is a good example. You can see that the plastic has a large gap and is cracked in many places. In this video, we will restore the steering wheel and go from this…to this.
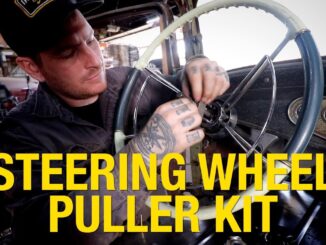
Since the steering wheel is made of a hard plastic, we’re going to use Polyvance’s PlastiFix kit to fill in the gaps. PlastiFix works really well on rigid plastics. First, we disconnect the battery so that the horn doesn’t blow when we try to remove the horn ring. Next, we remove the horn ring and the steering wheel.
Clean the steering wheel with Super Prep Plastic Cleaner. In your PlastiFix kit, you will find instructions, a bottle of PlastiFix liquid, PlastiFix powder, a popsicle stick, mixing cups, a reusable molding bar, two needles, an applicator bottle, and a pipette. Unscrew the cap and remove the tip from the applicator bottle by tilting it until it comes out. Transfer liquid into the applicator bottle with the pipette. Replace the tip by pushing it in until it snaps, and then push the needle onto the tip until it is tight. Now, transfer some PlastiFix powder into the mixing cup that has a lid. The needle for PlastiFix is unusual because the hole of the needle is not at the tip; instead, the hole is 8 millimeters away from the tip. This allows the liquid to flow down to the tip which helps prevent the needle from getting clogged.
Here it is in slow motion showing how to apply PlastiFix. Squeeze the applicator bottle so that the liquid runs down the needle and drips into the powder. One or two drops are enough. Stab the ball that forms in the powder, but don’t stab too deeply or you will clog the needle. When you are ready to deposit the PlastiFix, give the bottle another squeeze and let the liquid wash off the ball of powder. For this crack, we used aluminum tape to contain the PlastiFix while it cures. Continue to fill the void using this method. You will get quicker at this in just a few minutes.
Continue filling in cracks around the steering wheel. On the narrow cracks, use the needle to push the mixture into the crack. You can use a gloved finger to push the mixture into the crack, too. Go around the steering wheel filling in as many voids and cracks as you can find. Later we’ll see how to find the ones you missed.
Another technique is to use the mixing cup that doesn’t have a lid and mix up a small batch of PlastiFix and trowel it in. Pour some PlastiFix powder into the cup. Next, pour some liquid into the cup and mix it together with a popsicle stick. You may need to add more liquid or powder to get the right consistency. Use the popsicle stick to trowel the mixture into the cracks. There isn’t a lot of working time before the mixture starts to get too thick, so work quickly. PlastiFix does not stick to polypropylene, so don’t throw away the polypropylene mixing cup. Wait for the PlastiFix to cure, and it will peel right out.
After the PlastiFix is cured, peel the tape and fill in any low spots with more PlastiFix. Now it’s time to start sanding. This is the most time-consuming part. Get different grit sandpaper, sanders, and sanding blocks to get it as smooth as possible.
If you happen to find any low spots while sanding, fill them now before you forget. There’s almost no waste when using the needle dropper method.
These cracks are tiny and not too deep, so it will be quicker to fill it with Polyvance’s Hardset Epoxy Filler. Once the filler cures, continue sanding.
Get the steering wheel ready for primer by taping off what you don’t want to get painted. Even though you may think you had this steering wheel really smooth, the primer will help you see the imperfections. Clean the steering wheel with Super Prep. We used a cheap lazy Susan to make the painting easier…you can do it without one, though. We used a roll of tape to elevate the steering wheel on the lazy Susan. Spray the steering wheel with Plastic Magic Adhesion Promoter and wait for it to dry before turning over the steering wheel and spraying more Plastic Magic. Use Polyvance’s E-Z Sand Waterborne Primer Surfacer and spray the entire steering wheel. This is a high build primer that will fill in sand scratches. Now you can see the areas that still need work. Use a Dremel tool to widen the gaps a little bit. This will give the PlastiFix more surface area to bond.
Allow the PlastiFix to cure and start sanding again. Use progressively finer grit sandpaper until it is smooth. We use the profile sanding blocks from an oscillating tool to sand inside corners and radius corners. Cutting sandpaper into narrow strips is helpful, too.
Once everything is sanded, clean the steering wheel with Super Prep Plastic Cleaner and apply Plastic Magic Adhesion Promoter to get it ready for the sealer. Use Polyvance’s All Seasons Waterborne Sealer and spray the entire steering wheel. Fill in any remaining scratches and pin holes with spot putty and sand them smooth.
Get some automotive paint in the color you need. We used a single-stage urethane paint. The mix ratio for our paint was four parts paint, one part activator, and two parts reducer. We mixed the smallest amount possible in our pint mixing cup. We applied the paint using a touch-up gun since the surfaces needing paint were so narrow, and it worked out well, too.
We allowed the paint to cure for about 24 hours and then removed the masking tape. Here are some close-ups before we reinstall the steering wheel. It turned out really nice! Finally we reinstall the steering wheel.