From Sam Slick at Cherry Bomb…
“You know, the overwhelming number of questions we field here are from do-it-yourselfers who enjoy working on their own vehicles, and who may have little or no experience with exhaust projects. Over the years, we have honed our skills through blood, sweat, and tears and we would like to share our gained efficiencies with you.”
Sam Slick, Cherry Bomb
General Muffler Installation Guidelines
Use sturdy jack stands backed up with a floor jack as a minimum lift and support mechanism for your serviced vehicle. This should be done on a flat and level floor or surface. A shop service hoist is most preferred.
Always wear safety glasses when working on your vehicle. Shop or mechanics gloves are also recommended to protect your hands.
Allow adequate time for vehicle cool-down period as exhaust systems operate at extremely high temperatures.
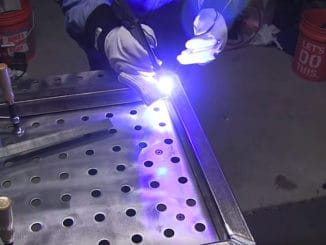
If using a welder during installation, always disconnect the vehicle battery first.
Layout your new muffler or exhaust system parts on the floor in the same sequence as the old system on the vehicle.
A heavy hammer and hacksaw are hand tools that will make your installation easier.
We recommend installing new bolts, brackets, clamps, flanges, gaskets, hangers, and springs where necessary to facilitate muffler or system assembly. Some may need to be purchased separately.
If reusing existing bolts or clamps, first apply penetrating oil to the threads prior to removal.
When cutting old muffler and pipe assembly, follow available specific instructions or cut as close parallel to the original muffler heads as possible. This will allow for enough existing pipe material to overlap on the new muffler bushings/nipples.
An alternate way to reusing existing pipes when replacing only the muffler is to slit the muffler necks/bushings/nipples to release the existing pipes.
Most universal mufflers are non-directional and can use either end as an inlet. However, some may be installed in only one direction. Make sure you understand your muffler’s design.
If you are installing this muffler within a cat-back or complete system, start your assembly from the front to the rear of the vehicle. Also, insert your new accessories in this sequence. Do not tighten your connections at this time.
For final muffler or system adjustment or fit, again start at the front of the vehicle and tighten your way back slightly moving or rotating components until you are sure of adequate clearance.
Restart the engine and check for leaks and unusual noise. Readjust parts as necessary.