Four-wheel drive independent front suspension (IFS) systems have been used on a lot of pickups since the 1980s. That’s when consumers started demanding pickups that were more comfortable and could be used every day.
LT has GM’s 8 1/4″ front differential that was pulled from the ’88 K 1500. That was the first year GM used IFS on a full-sized 4WD truck. A lot of people have no idea how these systems work or what it takes to disassemble them. So after running through the differences between IFS and solid-axle, LT will get into that.
The two are actually more similar than you might think. Both have a ring gear inside and ap inion gear that’s attached to the driveshaft coming from the transfer case. Both also have a way to disconnect power from the wheels so you’re not spinning the whole driveline going down the road.
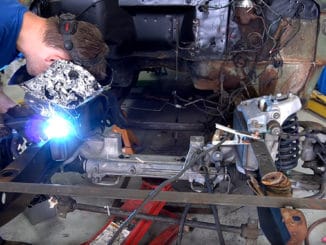
On the old-school axle, it’s on the end of the hub whereas on the IFS it has an electronic disconnect mounted inside the axle. That’s where the teardown begins.
A thermal linear actuator unscrews from the housing and a few bolts come out to take the differential apart. You can then see the passenger side two-piece axle disconnect system. This is what creates the link and power between the spinning wheel and the rest of the drivetrain. It’s a cool combination of electronic and mechanical parts.
It works as you apply 12 volts of power across the coil, the actuator heats up inside, expands, and pushes the rod out. When you remove power, it then contracts back in. The actuator installs into the side of the housing and as it expands the end pushes out.
There’s a small dowel on the outside axle shaft that centers the inside. As the shift fork extends, a collar slides over the splined areas of both parts of the axles engaging 4WD. When you disengage it, a spring pushes the shift fork back, releasing the collar. Finally, there is a small switch that tells the light on the dashboard when 4WD is engaged.
Disassembly continues with taking the remaining bolts off that hold the main case house together. A pry bar then opens it up. The CV flange on the driver side is held in with an internal clip so it takes a bit of force to pop out. From there, the carrier comes out.
Now that the cases are fully split, you can put on new bearings, re-seal it, or even re-gear. Now that it’s apart, it’s pretty easy to get it back together!