
Estimated reading time: 10 minutes
There are a lot of reasons why you may be considering a chassis/body swap for your classic car, truck, or custom. We are not here to ask why, but will hopefully point out areas that should be considered and thought through before you fire up your cutting torch.
Bear in mind, this is general chassis/body swap information and applies to any vehicle build or project that involves placing the body of one vehicle on a chassis from another vehicle; one that it was not originally manufactured for.
An Overview of Swapping Your Classic Car, Truck, or Custom Body to a Late Model Chassis and Drivetrain

There are several chassis/body swaps referenced in this article below, each of which demonstrates how a complete chassis/body swap can be accomplished by regular Joes. If you (or your project helpers) are capable of basic fabrication and welding and have decent automotive skills, know-how, and understanding, you can do this.
Think first and be aware of the cautions below, whether you are doing your body swap in the backyard with several buddies, or in a well-equipped space with a lift, etc.
First and foremost: Find a swap that suits your skills. There are many ways to accomplish any given build or swap. Be creative, but be realistic. Some well-planned swaps can be done in a weekend. Others can be quite complicated and present you with unexpected challenges.
Decide what you are willing to modify when doing this swap:
- Steering?
- Suspension?
- Make custom body (or motor) mounts?
- Wheel well tubs?
- Shorten or Lengthen the chassis?
- Shorten the body (or truck bed)?
- Custom fuel tank?
Grab a handy-dandy notebook and a good tape measure (smartphone apps).
- Measure both vehicles: wheelbase, track width(s), frame width(s), frame length(s), overall shape; the “rises” and “dips” in the chassis rail, engine compartment and firewall clearances, fuel tank locations, etc.
- Get basic clearances from the donor car. If you are slammin’ your ride, you’ll need to consider wheel, tire size, and fender fitment.
If you are able to, get your hands on Factory Service Manuals for each of the vehicles you are using to do the swap. Many dimensions are in the manuals, saving you time and ensuring accuracy.
Some manuals are available on our tech pages, but also check a favorite resource of ours: The Old Car Manual Project
Play devil’s advocate: Determine what challenges the project will present that you don’t have a solution for. Look at every detail or anything that may cause you to reconsider your chassis/body swap project — If it never gets completed and driven, it will be added to an already long list of dormant projects — an essentially worthless pile of parts.
Paramount when considering a chassis/body swap is the wheelbase measurement of both vehicles. It should be as close to identical as possible. Several millimeters are usually negligible, but little else takes away from a ride as much as tires not centered or properly placed in the wheel wells.
Out of placement wheels are very noticeable, especially on lowered vehicles, and it makes the build feel half-assed. Don’t be that guy.
It can be difficult to find a chassis/swap donor that is largely going to be a natural fit (with minor modifications) in terms of wheelbase, track-width, etc.
We’ve put together the Chassis Swap Donor Vehicle Search to help you identify potential donor vehicles.
For disparate wheelbase swaps, consider another chassis for the swap, or consider adding a section to the body, to compensate. If you are swapping a pick up onto your chassis, it’s easy to add or remove a section of the bed.
We do not generally recommend lengthening or shortening a frame in the center by adding or removing sections unless you are doing a custom.
Narrowing a chassis may make sense in particular projects, however.
If you are set on a particular mismatched swap, or you simply want to “make it work”, ensure you are fully aware of what’s involved including the skills required, tools, knowledge, and time.
As with everything, you’ll need more space than you need to reasonably complete a chassis/body swap, especially if you are doing it in a day or over a weekend. When the two vehicles start coming apart to fully stripped, you’ll find that you’ll produce a lot of debris and leftover and unnecessary parts to scrap, that you can’t just put in the trash, or take to the dump.
A Note on Performance: A proper chassis/body swap will include freshening the donor; bearings, brakes, shocks, fluids, plugs, wires, etc. Assuming this has been done, coupled with the weight reduction (in most cases, especially truck builds) of a body swap, these hybrid vehicles perform quite nicely simply due to the power-to-weight ratio. This means they also stop well too. Get your project running first, put it through its paces, then decide if there are any further modifications you want to make.
4th Generation (1991-1996) GM B-Body Chassis
We like the 4th Generation (1991-1996) B-Body chassis. At 115.9 inches it’s a great candidate for many 116 inch 40s, 50s, and 60s vehicles. When customizing the B-Body platform with airbags, for example, you’ll find pre-configured, tried-and-true kits ready to install, and far more affordable than building a setup from scratch.
Also, when using a late-model donor car or truck for your resulting vehicle, you’ll find that parts will be readily available, common (in-stock), and most often, far more affordable than other options.
Watch a Chassis / Body Swap Happen in 60 Seconds
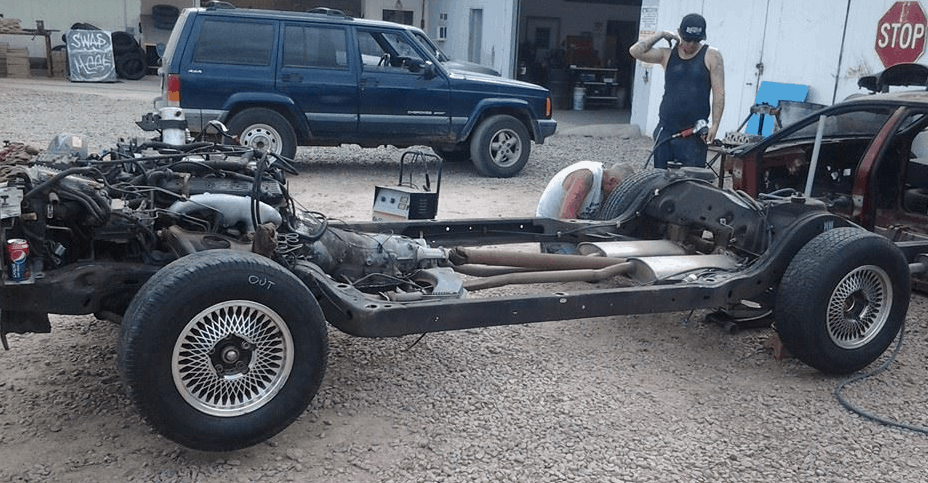
Watch a full Caprice Classic tear down, body swap, and 1959 GMC Fleetside truck cab plant in this 60-second time-lapse video which captures roughly 5 1/2 hours working time from the first photo to the last (See the full 1959 GMC Fleetside Truck / B-Body Chassis Swap):
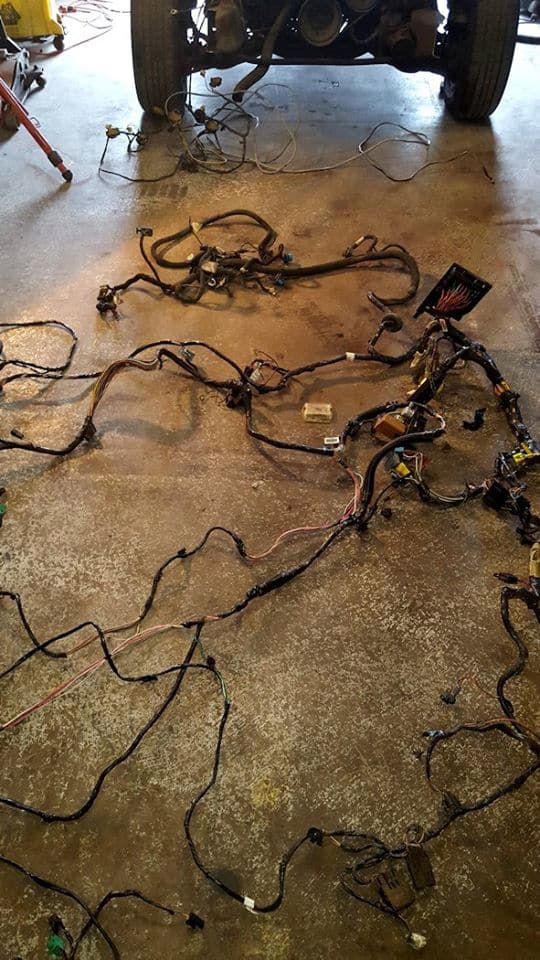
As the donor car comes apart, we can not stress enough the importance of BAGGING, TAGGING, and MARKING EVERYTHING you take apart. Have plenty of zip-lock freezer bags (freezer bags are stronger and have a label section for marking clearly), masking tape, and Sharpies on hand. Zip ties and electrical tape can also be handy to keep the harness managed in sections as it comes out of the donor.
Don’t cut the harness: Take the time to remove the harness whole. It went in whole, after all. Separate sections as needed and keep the bundle to a minimum. For example, remove the rear-door harness sections, bag and tag them and get them out of the way as soon as they come out of the doors (most harnesses will have locking clips to remove sections of the harness). If you get the harness out whole, and largely put it back in whole, odds are you’re going to fire your project up first try.
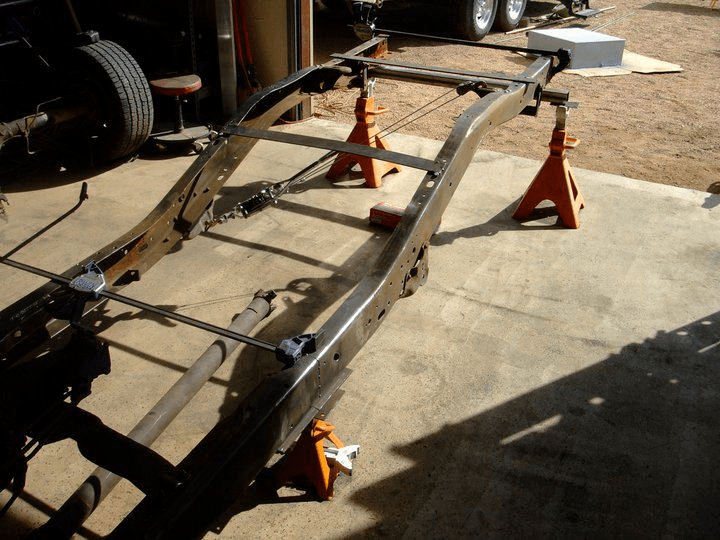
The body mounts of both vehicles and the “perches” for the body mounts on the two vehicles’ chassis are important. How different they are, will decide how difficult your swap will be. You will have to make custom body mounts from scratch or adapt ones from another application.
You sure don’t want to build a custom car or truck only to discover that you’ll never be able to register it. Do your research, consider every factor, and every aspect of any given swap long before you begin. Don’t rush, take your time. You’ll be amazed at what is possible.
Chassis / Body Swap Example Build Albums:
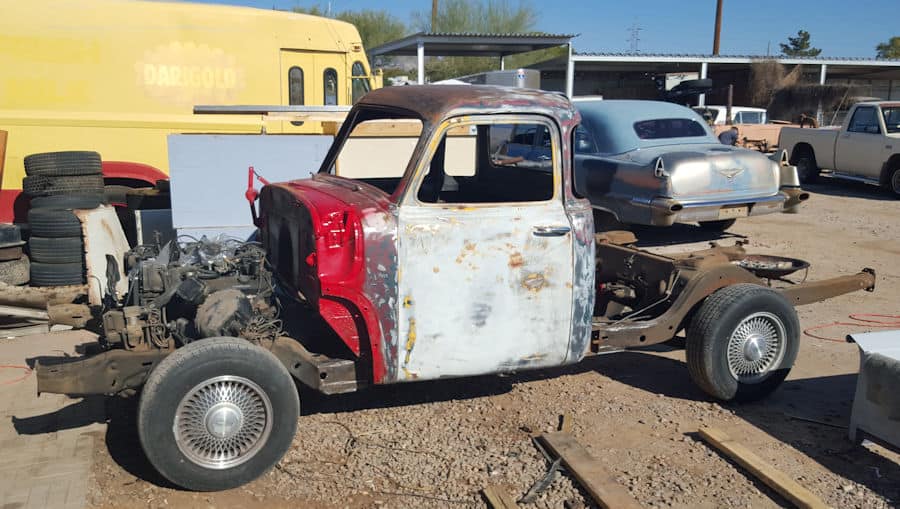
- 1959 Chevrolet Apache Sleeper / 1990s Caprice Classic Chassis Body Swap
- 1959 GMC Fleetside Truck / 1990s Caprice Classic Chassis / Body Swap
- 1956 Ford COE / 1990s Ford E350 Box Truck Chassis / Body Swap
- 1950 Chevrolet Sedan Delivery / 1990s Caprice Classic Chassis / Body Swap
- 1951 GMC Truck / 1990s Caprice Classic Chassis / Body Swap
- 1949 Studebaker Truck / 2nd Gen Camaro Sub-frame + S-10 Frame Rails
- 1947-54 Chevy 3100 Wide-Body Stretch and SSR Chassis Swap
- 1940 Willys Cabover Custom / 1992 Dodge 1 Ton Extended Cab Pickup Build
- 1966 Ford F-100 / 2003+ Ford Crown Victoria Police Interceptor Chassis Body Swap
- How To Narrow a GM B-Body Chassis
Helpful Chassis/Body Swap Planning Tools:
- How To Determine Suspension, Brake, and Wheel Clearance
- Wheelbase Cross-Reference – Chassis Donor Locator
- Wheelbase Measurements for Popular Classic Cars
- Rear-End Widths of Classic American Cars
- The Old Car Manual Project
How Much Does a Chassis/Body Swap Cost?
We have done a lot of classic car and truck chassis/body swaps, enough to generalize things from a cost standpoint, but keep in mind, you can make this as expensive as you like.
Generally, those that are concerned about cost are short on cash. Unless you’ve got friends with donors, you can expect this to roughly be the least you’ll get away with and still come away with a solid ride:
$600 – $1,000 — 40s, 50, 60s Body Donor
You’re looking for a solid vehicle. The drive-train is unimportant and if it’s missing, should help get the buy price down. Look at the glass, door hinges, latches, hood, trunk. Does everything basically function? As with anything, you can spend as much as you like. This roughly $800 purchase price, in our experience, is about as low as you’ll get under normal circumstances.
$600 – $1,000 — Late-model Chassis / Drive-train Donor
Again, you’re looking for a solid vehicle (not body and interior – solid chassis and drive-train) that runs. Our favorite finds were decent cars with often < 100K miles that had been in a minor wreck. Don’t worry if its tired, once you have the body off, swapping consumables like bearings, brake rotors and pads, fluids, etc is a breeze. If you are on a budget, buy a car that runs, where essentially everything functions. If you’re automotive handy, you can also pick up a blown motor car for a couple hundred bucks and drop a fresh long-block in it for $1,500 +/-. Again, you can spend as much as you like, but under normal circumstances, your bottom end on a solid running donor will be roughly $800.
$200 – $300 — Miscellaneous Parts and Supplies
Our goal with most of these swaps is to as much as possible use parts and resources from both donors to solve all of the problems of getting the two vehicles to become one. There will be some adapters and fittings and miscellaneous items that will need to be purchased.
Figure $2,000 – $2,500 as the bottom (realistic) line to acquire a complete body donor (less drive-train) and running chassis donor + the miscellaneous parts and supplies and come away with a running, driving chassis body swap.
